These Chocolate Peppermint Cookies are the perfect holiday treat to add to your baking list this season! Buttery chocolate shortbread cookies dipped in peppermint white chocolate and topped with crushed candy canes.

Get into the holiday spirit with these festive Chocolate Peppermint Stocking Cookies! Not only are they oh so adorable, they are also so easy and fun to make.

Chocolate Peppermint Cookies Ingredients
Chocolate Shortbread Cookies
- Unsalted Butter - Make sure your butter is at room temperature butter, which is around 68ºF (20ºC). You can quickly bring butter to room temp by cutting into small cubes and leaving on the counter.
- Vanilla Paste or Extract – Adds extra flavor
- All-Purpose Flour – Use a high quality flour, such as King Arthur for best results.
- Cocoa Powder - Use black cocoa powder or Dutch process cocoa powder for intense chocolate flavor.
- Confectioners' Sugar – The key to soft, melt-in-your-mouth shortbread cookies is using confectioners’ sugar.
- Fine Salt - Use fine salt for best results.
White Chocolate Peppermint Coating
- White Chocolate - Use a high quality baking white chocolate bar or candy melts. White chocolate chips contain stabilizers which isn't ideal for melting.
- Coconut Oil - I like to use coconut oil because it's light in color. You can also use a neutral oil such as canola or grapeseed oil. Oil is used to thin out the coating. The thinner it is, the easier to work with.
- Peppermint Extract - We'll be using just a bit to add extra flavor. If you don't have peppermint, you can use mint extract or omit it all together.
- Candy Canes - We'll be crushing them and sprinkling them on our cookies.
Chocolate Peppermint Cookies Instructions
Detailed instructions are in the recipe card below!
Chocolate Shortbread Cookies
Step 1 – With a hand-held mixer or in the bowl of your stand mixer fitted with a paddle attachment, mix room temperature butter and vanilla until light and fluffy. About 2 minutes on medium. Then add sifted confectioners’ sugar and mix until incorporated.
Step 2 – Next, sift in flour, cocoa powder and salt. On the lowest setting, mix until just combined.
Step 3 – Transfer dough to cling wrap and chill for at least 1 hour. I like to shape the dough into a rectangle, about ½ inch (1.27 cm) thickness to make it easier to roll out later.
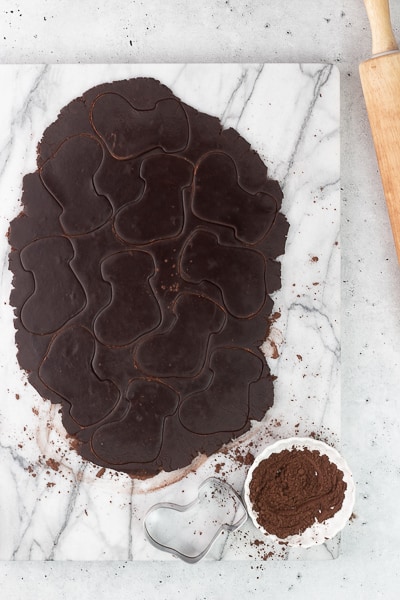
Step 4 – Sprinkle cocoa powder onto your work surface and roll your dough out to about a little over ⅛ inch (3.1 mm) thickness. Lightly dip your cookie cutter into cocoa powder and cut out your cookies. With a metal spatula, carefully transfer the cookies to a parchment lined baking tray, placing them 1 inch apart. Gather the scraps, reroll and cut out more cookies. I used a 3 inch (7.6 cm) stocking cutter and got 16 cookies. It may vary for you depending on how thick or thin you roll out your dough and the size of your cutter. If at any point the dough gets too warm from handling, don’t fret, pop it back in the fridge for 15 minutes or so to firm up!
Step 5 - This step is optional, but if you would like to hang the cookies like ornaments, punch a tiny hole in the upper right corner of your stockings. I used the end of a skinny piping tip. Make sure to stay away from the corner's edge and you'll want the hole to be large enough to insert twine through. Place the tray of cookies into the freezer for 20 minutes before baking. This is a very important step and cannot be skipped.
Step 6 – Bake at 350ºF (176ºC) for 10 to 12 minutes. Allow to sit on the tray for several minutes, then transfer to a wire rack to cool completely.


White Chocolate Peppermint Coating & Assembly
Step 1 - Add candy canes to a small ziploc bag and crush with a rolling pin or meat mallet. Pour in to a small bowl or dish and set aside.
Step 2 - Add white chocolate to a 1-cup glass measuring cup. Melt in your microwave in 20 second intervals. Stir until smooth. Add 1 to 2 teaspoons of oil and stir until smooth. Once you are happy with the consistency, add peppermint extract and mix until incorporated.
Step 3 - Gently dip the cookies into the white chocolate, letting the excess drip off. Using a toothpick or skewer, poke through the hole, sprinkle crushed candy cane to the white chocolate (front and back) and then set on a parchment lined baking sheet. If at any point the candy gets stuck in the hole, just use a toothpick or skewer to clear it out.
White chocolate can solidify or thicken quite quickly. If you find it hard to work with, just pop it back in the microwave in 15 second intervals. Careful not to overheat it as it can seize up.


Step 4 - Place in the fridge to set up for at least 20 minutes. Once the white chocolate has hardened, thread with twine if you wish. Enjoy!

Recipe Variations
- If you don't have a stocking cutter, you can use any cookie cutter, a small biscuit cutter or cut into squares.
- Not a fan of white chocolate? Dip it in milk, semi-sweet or dark chocolate instead.
- You can also dip the whole cookie into the coating. You may have to double the coating recipe.
- If you don't like peppermint, leave the extract out and you can sprinkle with nuts or toffee bits.
- This recipe can easily be doubled to make more cookies, especially if you have larger cookie cutters.
Expert Tips
- Follow the recipe exactly. My recipe has been carefully tested and written in grams to ensure you get the best results. I highly recommend weighing the ingredients with a kitchen scale, as it’s the most accurate way to bake. You can read more about this below!
- If you are not using a kitchen scale, measure your flour correctly. Fluff and aerate your flour first, then spoon into your measuring cup and finally level off with the back of a butter knife. Do not pack it in as it will add too much flour.
- Chill, chill and chill! The best part about shortbread cookies is that it’s full of butter. To prevent the cookies from spreading and losing its beautiful shape, we will need to chill the dough several times.
- After rolling out the dough, I like to put it back in the fridge to firm up for 15 minutes. It makes it easier to cut out your cookies.
- When cutting the cookies, you can also dip the cutter into cocoa powder to help them release easier.
- You can make the dough 5 days in advanced. Just wrap tightly in cling wrap and store in the fridge. When you are ready to roll out your dough, allow to sit on the counter to soften a bit before rolling out.
- Do not underbake these cookies. They should be cooked through and somewhat crisp.

YOU MAY ALSO LIKE
Did you try this recipe? Please consider leaving a 5-star rating and review below and tag me on Instagram @shortstackkitchen. This provides helpful feedback to myself and other readers. Thank you so much!
📖 Recipe

Chocolate Peppermint Cookies
- Total Time: 2 Hours
- Yield: 16 Cookies
Description
These Chocolate Peppermint Cookies are the perfect holiday treat to add to your baking list this season! Buttery chocolate shortbread cookies dipped in a peppermint white chocolate and topped with crushed candy canes.
Ingredients
Chocolate Shortbread Cookies
- ½ Cup (113 g or 1 stick) Unsalted Butter
- 1 Tsp Vanilla Paste or Extract
- ½ Cup (56 g) Confectioners’ Sugar, sifted
- 1 Cups (120 g) All-Purpose Flour, sifted
- ¼ Cup (21 g) Cocoa Powder, sifted
- ½ Tsp Fine Salt
White Chocolate Peppermint Coating
- 4 Oz (114 g) White Chocolate, finely chopped
- 1 to 3 teaspoon Coconut Oil or Neutral Oil
- 1 Tsp Peppermint Extract
- 2 Standard Sized Candy Canes, crushed
Instructions
- With a hand-held mixer or in the bowl of your stand mixer fitted with a paddle attachment, mix room temperature butter and vanilla until light and fluffy. About 2 minutes on medium. Then add sifted confectioners’ sugar and mix until incorporated.
- Next, sift in flour, cocoa powder and salt. On the lowest setting, mix until just combined.
- Transfer dough to cling wrap and chill for at least 1 hour. I like to shape the dough into a rectangle, about ½ inch (1.27 cm) thickness to make it easier to roll out later.
- Sprinkle cocoa powder onto your work surface and roll your dough out to about a little over ⅛ inch (3.1 mm) thickness. Lightly dip your cookie cutter into cocoa powder and cut out your cookies. With a metal spatula, carefully transfer the cookies to a parchment lined baking tray, placing them 1 inch apart. Gather the scraps, reroll and cut out more cookies. I used a 2.5 inch (6.3 cm) stocking cutter and got 16 cookies. If at any point the dough gets too warm from handling, don’t fret, pop it back in the fridge for 15 minutes or so to firm up!
- This step is optional, but if you would like to hang the cookies like ornaments, punch a tiny hole in the upper right corner of your stockings. I used the end of a skinny piping tip. Make sure to stay away from the corner's edge and you'll want the hole to be large enough to insert twine through. Place the tray of cookies into the freezer for 20 minutes before baking. This is a very important step and cannot be skipped.
- Bake at 350ºF (176ºC) for 10 to 12 minutes. Allow to sit on the tray for several minutes, then transfer to a wire rack to cool completely.
White Chocolate Peppermint Coating
- Add candy canes to a small ziploc bag and crush with a rolling pin or meat mallet. Pour in to a small bowl or dish and set aside.
- Add white chocolate to a 1-cup glass measuring cup. Melt in your microwave in 20 second intervals. Stir until smooth. Add 1 to 2 teaspoons of oil and stir until smooth. Once you are happy with the consistency, add peppermint extract and mix until incorporated.
- Gently dip the cookies into the white chocolate, letting the excess drip off. Using a toothpick or skewer, poke through the hole, sprinkle crushed candy cane to the white chocolate (front and back) and then set on a parchment lined baking sheet. If at any point the candy gets stuck in the hole, just use a toothpick or skewer to clear it out. White chocolate can solidify or thicken quite quickly. If you find it hard to work with, just pop it back in the microwave in 15 second intervals. Careful not to overheat it as it can seize up.
- Place in the fridge to set up for at least 20 minutes. Once the white chocolate has hardened, thread with twine if you wish. Enjoy!
Notes
- Store cookies in an airtight container at room temperature and enjoy for up to 5 days.
- Prep Time: 20 Minutes
- Chill Time: 1 Hour + 20 Minutes
- Cook Time: 10 to 12 Minutes


Shelby says
This shortbread is delicious! Lisa’s recipe is thorough and easy to follow. Chocolate-y, crunchy, and versatile enough to use for more than just Christmas, I will definitely be using this recipe again. 🙂
Lisa says
Thank you so much for trying this cookie recipe! I'm so happy you enjoyed them!🙂